Friday, November 23, 2012

The complete tutorial for Stellaris Launchpad development with GNU/Linux (II)

Did you follow my previous tutorial? We set up the toolchain, built StellarisWare libraries, compiled lm4flash tool and flashed an example to the Stellaris LaunchPad. So... you are brave and even started writing your own code. That's great news! Unfortunately programs have a nasty tendency to fail, and debugging using LEDs and traces is not convenient for big projects. Don't worry, in this chapter we will learn how to set up a full debugger (gdb + openocd). This way you will be able to debug the code setting up breakpoints and watching variable values. This tutorial is based on this tutorial by Mauro Scomparin (scompo). You can follow it instead of this one, I just wanted to write it again to have all the tutorials in one place, and to fit the directory structure I'm using. But there are almost no differences between both tutorials.

Building OpenOCD

At the time of writing this tutorial, there is not official support in OpenOCD for the ICDI protocol used in the Stellaris LaunchPad integrated debugger. But don't worry, Spencer Oliver has patched it to add support. When this patch is pushed into the main OpenOCD branch, it will not be necessary to follow this tutorial. Just install it using the repository of your distro, and it's done. But now we will have to do it the long way:
  1. Download the sources
cd ~/src/stellaris
git clone git://openocd.git.sourceforge.net/gitroot/openocd/openocd
  1. Install the required dependencies
sudo apt-get install libtool libusb-dev
  1. Apply Spencer Oliver patches:
cd openocd
git pull http://openocd.zylin.com/openocd refs/changes/22/922/14
  1. And build it:
./bootstrap
./configure --enable-maintainer-mode  --enable-ti-icdi
make
  1. To install it I have also followed scompo's suggestion about not executing make install but copying the required files manually:
cd ~/src/stellaris
mkdir openocd-bin
cp -r openocd/tcl/* openocd-bin
cp openocd/src/openocd openocd-bin
gdb is already built. We built it in the previous chapter, when we built the toolchain. So we can start using it, but before, we must build something to debug.

Avoiding Stellarisware obscure licenses

As I wrote in previous chapter, there's no problem with StellarisWare library license, but the examples that come bundled with it use a more obscure license terms, including the startup code, the linker scripts and the makefiles. So to avoid problems with this license, you should not use these files. Again, scompo comes to rescue us. He wrote a template project, including a makefile, startup code and a linker script you can use in your own projects. You just have to preserve the header in the files (with the copyright notice) and everything should be fine. Let's build this template project:
  1. Download the project
cd ~/src/stellaris
git clone https://github.com/scompo/stellaris-launchpad-template-gcc.git
cd stellaris-launchpad-template-gcc
  1. Edit the makefile to set the path to the StellarisWare library. Change this line:
STELLARISWARE_PATH=~/stellaris/stellaris/
to this:
STELLARISWARE_PATH=~/src/stellaris/stellarisware/
  1. And build:
make
At last, it's time to start debugging!

Using the debugger

First of all, you have to create a config file for openocd. Rickta59, a Stellarisiti forum user, wrote one working perfect. Then you'll only have to start both openocd and gdb.
  1. Download the config file:
cd ~/src/stellaris/openocd-bin
wget http://pastebin.com/download.php?i=qXxeYsVx -O LM4F120XL.cfg
  1. With the Stellaris LaunchPad debug port connected to the PC, and the power select switch in the "debug" position, run openocd. Before starting it, make sure you created the udev rule for the Stellaris LaunchPad as written in the previous chapter, to avoid having to run openocd with root privileges:
./openocd --file LM4F120XL.cfg
  1. openocd should be running without problems. If it fails, try running it as superuser (with the sudo prefix). If it works with sudo, maybe you have not properly created the udev rule! If it's working, now you'll only have to start gdb. Open another terminal and type:
cd ~/src/stellaris/stellaris-launchpad-template-gcc
arm-none-eabi-gdb main.axf
  1. gdb should have started, and you should be greeted by the (gdb) prompt. At this prompt you should start writing some commands. The first one will connect gdb to openocd, and the following ones will load the program and initialize the debug process:
target extended-remote :3333
monitor reset halt
load
monitor reset init
  1. You can enable some breakpoints and watch the contents of the count variable. Then continue execution with the 'c' command:
b main.c:51
b Timer1A_ISR
display count
c
  1. The execution will hit a breakpoint, and the line at which the code is stopped will be printed, along with the value of the count variable. You can type 'c' command several times to continue execution and watch the contents of the count variable each time the program stops at a breakpoint. When you finish debugging, you can exit gdb with the 'q' command. To exit openocd, just switch to it and hit [CTRL] + C.
And that's all. Now you can build and debug anything you want for your StellarisLaunchpad using GNU/Linux. What did you say? You don't like command-line debugging? Me neither! So stay tuned, because in the next chapter, you'll learn how to set-up an Eclipse project, using its full code building and debugging capabilities!

Happy hacking and stay tuned!

Troubleshooting

You followed the steps without changing a single thing, and got to step 4 of the "Using the debugger" sub-chapter. But then something went wrong and when trying to connect to openocd with the target command, you received this cryptic error message:
Remote 'g' packet reply is too long:
000000000000000000000000000000000000000000000000000000000000000000000000000000000
000000000000000000000000000000000000000010000000000000000000000000000000000000000
000000000000000000000000000000000000000000000000000000000000000000000000000000000
000000000000000000000000000000000000000000000000000000000000000000000000000000000
000000000000
It looks like there's a known bug in openocd causing this issue with some versions of gdb. Until this bug gets fixed, you can workaround it:
  1. Download this target description file to the directory where the project you want to debug is (in this case, to ~/src/stellaris/stellaris-launchpad-template-gcc).
cd ~/src/stellaris/stellaris-launchpad-template-gcc
wget http://pastebin.com/download.php?i=0Lu3Bu0R -O target.xml
  1. Start gdb as usual, but before issuing any other command, write this one at the gdb prompt:
set tdesc filename target.xml
  1. Continue writing commands as usual, hopefully the error should be gone, and everything should work perfect now!

Wednesday, November 21, 2012

The complete tutorial for Stellaris LaunchPad development with GNU/Linux (I)


So you bought the Stellaris LaunchPad, this powerful and cheap development board. Maybe you are even one of the lucky ones that bought it for only $4.99. You received it, grabbed a breadboard, some wires, resistors, capacitors and ICs, mixed all together and are ready to start writing software, but... what options do you have for developing software for this platform? Let's see what TI has to offer on the Stellaris LaunchPad web page:
  • Code Composer Studio (CCS) is the IDE from Texas Instruments. It's Eclipse based and you can use it with the Stellaris Launchpad without any limit on the code size.
  • Keil RealView MDK-ARM: This is a popular IDE supporting several chip architectures, including the ARM Cortex M4 in your Stellaris LaunchPad. You can freely download an evaluation version, which is 32 kiB code size limited.
  • IAR Embedded Workbench. Another popular IDE. It has also an evaluation version, with a 32 kiB code size limit.
  • Sourcery Codebench. An IDE by Mentor Graphics. You can download a 30-day evaluation version.
If you want to stick to non-limited non-pay options, you can use Code Composer Studio. End of story. See you in Hack a Day when you finish your neat gadget!

Are you still reading? If that's the case, maybe you don't like/have a Windows box for developing, and all the four IDEs I have mentioned are Windows only. But don't worry, of course you can develop for this board using GNU/Linux. Don't forget GNU/Linux is the best OS for software developing ;-).

I'll write some entries detailing all the process needed to set up the toolchain, build the StellarisWare libraries, build your project, flash and debug it and set up an Eclipse project. In the end, we will have a completely FOSS IDE without any time/code size restrictions!

But enough talk, let's get our hands dirty!

Building the toolchain

In these tutorials, I'll put all the tools for Stellaris development in a directory called src/stellaris under my home. The first step is to build the toolchain containing the assembler, C compiler and libraries, linker,  etc. To build it I followed the steps posted in Recursive Labs Blog, almost unmodified.
  1. Create working directory and change to it:
mkdir -p ~/src/stellaris
cd ~/src/stellaris
  1. Install the compiler and dependencies required to build the toolachain. In Ubuntu (and hopefully in most Debian based distros):
apt-get install flex bison libgmp3-dev libmpfr-dev libncurses5-dev libmpc-dev \
        autoconf texinfo build-essential libftdi-dev git
  1. Download the script for building the toolchain and run it. This step will take some time to complete, but when it finishes, you should have the toolchain ready to use, in the sat/ directory under your home:
git clone https://github.com/esden/summon-arm-toolchain
cd summon-arm-toolchain
./summon-arm-toolchain
Once the build is successfully completed, your toolchain will be ready for building programs for the Stellaris Launchpad. For convenience don't forget to add ~/sat/bin to your PATH variable. For example edit .profile file in your home, and add the following line at its end:
export PATH=$PATH:$HOME/sat/bin
You will have to restart your session for this change to take effect.

Building StellarisWare library

The easiest way to configure the Stellaris MCU and its peripherals is to use the StellarisWare library. This library is really complete and easy to use, and has another cool advantage: it's also included in the ROM inside the LM4F120 MCU (you just have to add the ROM_ prefix to the function calls to use the ROM software). This can help saving Flash memory space.

Fortunately the library uses a BSD license, the sources are available and come with gcc friendly makefiles. Building this library is as easy as:
  1. Download the library sources package. You can find it here. You'll need a my.TI account, so if you have not one, you'll have to register.
  2. Unpack and build the library. Make sure you change the path to the library package, in case you don't download it to the Downloads directory of your home:
mkdir -p ~/src/stellaris/stellarisware
cd ~/src/stellaris/stellarisware
unzip ~/Downloads/SW-EK-LM4F120XL-9453.exe
make
These steps will build StellarisWare library and also the examples. StellarisWare example files are not BSD licensed. They have some obscure license terms, including the startup code files, the linker scripts and the Makefiles for building them. This can be a problem for some users, so be warned.

Building and using lm4flash

lm4flash is a tool for flashing binaries to the MCU. This step is not strictly required, because you can flash programs to the MCU using gdb + openocd, but it's easy to do, fast, and sometimes using lm4flash tool is more convenient. Just follow these steps:
  1. Download lm4tools and build lm4flash:
cd ~/src/stellaris
git clone https://github.com/utzig/lm4tools.git
cd lm4tools/lm4flash
make
  1. If everything went OK, you should have the lm4flash binary sitting in the current working directory. Maybe this is not the cleanest installation method, but I moved lm4flash to ~/sat/bin for it to stay in the PATH:
mv lm4flash ~/sat/bin/
  1. Before flashing anything to the board, it's recommended to create a new udev rule so you can use lm4flash (and openocd later) without superuser permissions (i.e. without being root or using sudo). You will also have to add your user to the "users" group if it's not in it already. So only execute the last sentence if you need to do so, and if you do it, replace <username> with your user name:
echo 'ATTRS{idVendor}=="1cbe", ATTRS{idProduct}=="00fd", GROUP="users", MODE="0660"' | \
        sudo tee /etc/udev/rules.d/99-stellaris-launchpad.rules
sudo usermod -aG users <username>
  1. If the board was plugged to the USB debug port, unplug it. Make sure the PWR SELECT switch is at the DEBUG position and connect the USB debug port to a USB port in the PC. If the rule is working, you will have permission to access the /dev/ttyACM* device created when you plug the board. Now you can test everything you have done until now, by flashing one of the examples, like this:
cd ~/src/stellaris/stellarisware/boards/ek-lm4f120xl/blinky/gcc/
lm4flash blinky.bin
The program should be successfully flashed to the MCU, and you should see a green LED blinking in the board. If that's the case, congratulations, your toolchain is working perfect!

In the next chapter we will learn how to set-up OpenOcd and GDB for debugging programs. We will also see how to avoid problems with the clunky license that comes with the examples in the StellarisWare package.

Happy hacking, and stay tuned!

Sunday, September 2, 2012

Making an IP webcam using an old router


Recently I got my hands on an old Comtrend CT536+ router. It wasn't working. When turned on, some times it worked for a while, but most of the times it just didn't even boot. I decided to try fixing it, so I opened the unit, had a look at its internals and found two capacitors in the power source with a slight bulging. These capacitors could be victims of the annoying capacitor plague, so I replaced them with new low ESR ones and... the router started working!

One of the damaged capacitors next to the two new ones

Installing a USB Host port

Since I took the trouble to open the router, I decided to add some enhancements. The components for the USB Host were not populated in the PCB, so I added a USB Host connector, a capacitor, some SMD resistors and some wiring to get the extremely useful USB Host port. I also added some wires to connect a 3.3V UART, just in case I need to access the GNU+Linux console.

USB mod

Finally I used a file to enlarge the hole for the Ethernet ports in the back of the router, to make room for the new connector. This is how the back of the router looks like now:

The new USB Host connector, ready to be tested

WARNING: Before you plug anything to the new USB Host, you must have in mind the 5V for the host are provided by a 78L05 linear regulator. This regulator was already populated inside the router (I don't know why, because it's only used for the USB Host) and can only supply 100 mA. Some USB devices can draw up to 500 mA, so you have to be careful. Only plug devices drawing less than 100 mA. If you need to plug something needing more juice, use a self-powered USB Hub to plug it, or remove the 78L05 regulator and add a bigger one.

Router internals, including the USB mod

Installing OpenWrt and USB Host driver

Unfortunately, the USB Host port is useless with the firmware that comes with the router. The solution to this problem is installing OpenWrt, a GNU+Linux distro suited for routers. Installation process for this router is dead easy, because it can be done directly using the Firmware Update function in the router configuration web page. Just download the OpenWrt image for this router and point it to the Firmware Update page.

After installing OpenWrt, it's recommended to configure the network. There are tons of ways of doing it, depending on your setup. Just have a look to the OpenWrt Wiki. You can also ask in the forum.

Once you have network working, to get the USB Host working, you have to install the host controller kernel module. The host controller in my router is an OHCI one. Other routers may have a different host controller (UHCI or EHCI). To install the OHCI host controller driver, access the router using SSH and use OPKG package manager:
opkg update
opkg install kmod-usb-ohci
The driver should be automatically loaded by the kernel, but if it is not, you can load it entering the command:
insmod usb-ohci
You can plug some USB stuff and have a look to the kernel messages (dmesg) to see if it's working. If you need to use the useful lsusb command, you can install usbutils package, but don't do it unless needed, because these routers usually have an extremely reduced storage (CT536+ only has 4 MB), so installing stuff can easily fill it.

Installing the webcam drivers

Now we can try getting the webcam working. To stream the video I use mjpg-streamer. But before using it, we have to configure the webcam. Supported webcams can be sorted in two families:

  1. The ones that have UVC support.
  2. The ones that have SPCA support.

I have tried two webcams. The first is this one I bought at DealExtreme. lsusb command lists it as Aveo Technology Corp (1871:0142). It supports UVC profile. The second one is a Logitech QuickCam for Notebooks (046d:08dd). It's supported by SPCA.

To get UVC webcams working, just install kmod-video-uvc package:
opkg install kmod-video-uvc
To get SPCA webcams working, you have to find its driver first. Search it inside this list. For example, for my Logitech webcam, the driver is zc3xx, so I have to install kmod-video-gspca-core + kmod-video-gspca-zc3xx:
opkg install kmod-video-gspca-core kmod-video-gspca-zc3xx

mjpg-streamer

Once you have the drivers for your webcam installed, plug it in the USB port and have a look to the kernel messages (dmesg) to see if it's properly recognized. If everything is OK, install mjpg-streamer:
opkg install mjpg-streamer
You can configure some mjpg-streamer parameters by editing /etc/config/mjpg-streamer. To start mjpg-streamer daemon, use the comand:
/etc/init.d/mjpg-streamer start
You can also enable it so it will be automatically started each boot, using the command:
/etc/init.d/mjpg-streamer enable
Once it's running, to watch the video captured by the webcam and streamed through mjpg-streamer, launch for example VLC media player, and select Media/Open Network Stream... (Ctrl+N). Then in the dialog enter the URL: http://<ip_address_of_the_router>:8080/?action=stream and click the Play button. Of course replace <ip_address_of_the_router> with the address (or dns name) matching your router. You should be able to see the video stream. Congratulations! You can also input that URL in any browser and it should work. It worked for me in Firefox 15 and Opera, but Chromium 21 displayed only a still image. The router can be configured as a wireless/wired IP webcam, and it retains its old functionality, so it still can be used as a standard router!
Opening network streams using VLC

You might wonder which driver is better: SPCA or UVC. These are my findings:
  • Using SPCA with the Logitech webcam, I got a very good framerate at 640x480 resolution. As this camera supported the MJPEG profile, mjpg-streamer only has to encapsulate the frames captured by the camera and send them. With this camera, router CPU usage is very low (around 5%).
  • Using UVC with the Aveo webcam I could only get 320x240 resolution and a very poor framerate (around 1 fps, I think). This camera only supports YUYV profile, so mjpg-streamer has to transcode the image captured by the camera. Even with the poor resolution and framerate, router CPU usage with this webcam is higher (around 15-20% with default compression quality). I wasn't able to make this webcam work with higher resolution/framerate.
Maybe the driver used (either SPCA or UVC) doesn't matter, but to avoid image transcoding, I suppose cameras supporting the MJPEG profile are preferred over the ones not supporting it.

Troubleshooting:

If your webcam supports only the YUYV profile (like my Aveo webcam), you will have to explicitly tell mjpg-streamer to use this profile, or it will not start. Edit /etc/init.d/mjpg-streamer and add the -y switch to the --input section. The line in which mjpg-streamer is called (the last line in the start{} section) should look like:
    [ $enabled -gt 0 -a -c $device ] && sleep 3 && $SSD -S -m -p $PIDF -q -x $PROG -- --input "input_uvc.so -y --device $device --fps $fps --resolution $resolution" --output "output_http.so --port $port" &
Note the -y switch after input_uvc.so, that enables YUYV mode.

Saturday, September 1, 2012

Arch Linux for WM8650 kernel/modules update

I got some time to update my build of the kernel and modules for the WM8650 netbooks. The main features of the updated kernel and modules are:
  • Includes all my previous patches to improve Ethernet compatibility, get battery readings, remove  some nasty debug messages, etc.
  • I have included a lot of drivers missing in my first builds: more wireless dongles, Bluetooth dongles, USB to serial adapters, ipv6, etc.
You can grab the updated kernel (and wmt_scriptcmd) here, and the updated kernel modules here. Extract the kernel to the root of the BOOT partition and the kernel modules to the root of the ARCH_SYS partition (as explained on steps 2 and 4 here).

I had no time to make modifications to the RT5370 driver to build it inside the kernel tree, so it's not included in the kernel modules I posted above. But don't panic, finally I got it to build, and it looks like it's working. I have not an RT5370 dongle to test if it works, but now insmod returns no errors when I load the module, so I suppose it should work. To install this module, first download it here. Then insert the SD card in your computer and unpack the driver (as usual replace /run/media/doragasu/ARCH_SYS/ with the path where the system partition of the SD card is mounted):
tar -xjf wm8650-rt5370_driver.tar.bz2 -C /run/media/doragasu/ARCH_SYS/
Then boot ArchLinux in your netbook and load the module using insmod (with root privileges):
insmod /lib/modules/2.6.32.9-test/kernel/drivers/net/wireless/rt5370sta.ko
As usual you can add this line to /etc/rc.local if you want the module to load each boot. You can also create a script lo load it whenever you want. Don't forget to enable the module with the gpio command!

In my netbook the module loads perfectly and outputs these messages:
rtusb init rt2870 --->
usbcore: registered new interface driver rt2870
Note the driver is the same for RT2870 and RT5370 chipsets. If you try this driver, please confirm if it works.

I also wanted to upgrade the entire distro to the latest version, but unfortunately I'm pretty busy and I have no time to do it. It was nice playing with this netbook, but I'd like to move to other projects, so I think I will not be releasing updates for it anymore.

I hope this updated kernel solves most of the problems with Ethernet, drivers, etc.

Enjoy!

Sunday, June 24, 2012

Building WM8650 netbook kernel

So you bought a WM8650 netbook, followed my previous posts and got Arch Linux working, but... the WiFi dongle inside your netbook is not a RT8188 one, or you need ipv6 support, or you want NFS support, or maybe you want to mess with the kernel code to fix some issues. Then you need to build a new kernel.

To build the kernel, I followed this great tutorial by John Williams. All the credit for finding the kernel sources and investigating how to patch them is due to him. I only did some small modifications to support WM8650 netbooks (his tutorial covers WM8650 tablets) and to avoid changing kernel variables that could break compatibility with Android Kernel. The kernel I'll show you how to build, lacks the WiFi driver. If the USB dongle inside your netbook is supported by the drivers included in the kernel, you can enable it and it will be built. If it's not supported (as happened with mine), you'll need to search for a suitable driver, and merge it in the kernel sources. I'll explain how to do it when I get some time to write a new tutorial.

The infamous menuconfig screen

You will need a compiler. You can install gcc and binutils in your WM8650 netbook and do all the process inside it. Building the kernel in the netbook takes about 15 minutes. You can also build it in your PC using a cross compiler for armv5te architecture. This will take a lot less time, but getting the compiler working can be a bit tricky. I'll not explain how to build/install a cross compiler, since there are a lot of good tutorials covering it, all over the net.

Once you have your compiler set up, we can start working. The first step is downloading the sources. Unfortunately the sources for the kernel that come with the Android distro aren't easy to find. There are some sources from Wondermedia available, but they lack the code for some drivers, and also include some binary blobs. An older version of the kernel sources included some of the missing drivers, and can still be found on the Internet. The first thing we must do is to download sources for both the older and the newer kernel, then unpack the older kernel and then unpack the newer kernel overwriting the older one. This way we get the drivers missing in the newer kernel, but with all the bugfixes and improvements of the newer kernel. Then we must clean the kernel tree:

wget http://ftp.gpl-devices.org/pub/vendors/Wondermedia/WM8650/KERNEL-DS_ANDROID_2.6.32_WM8650.111209.1514.tgz
wget http://projectgus.com/files/wm8650/KERNEL-DS_ANDROID_2.6.32_WM8650.110408.1903.tgz
tar -xzf KERNEL-DS_ANDROID_2.6.32_WM8650.110408.1903.tgz
tar -xzf KERNEL-DS_ANDROID_2.6.32_WM8650.111209.1514.tgz
cd ANDROID_2.6.32-DS/ANDROID_2.6.32
make distclean

Now we must set the kernel configuration and patch the kernel with the code to fix battery readings, ethernet, etc. Download this patch to the working directory and type in the console:

tar -xjf wm8650_netbook.patch.tar.bz2
patch -p1 < wm8650_netbook.patch
wget http://pastebin.com/download.php?i=UBZW78BW -O .config

If you want to change the kernel configuration, launch the menu based configurator:

make menuconfig

Once you finish, exit (saving changes if you want). We are ready to start building the kernel:

make uImage

This will take some time. Hopefully, there should be no errors, and when it finishes, you should have your new kernel under arch/arm/boot/uImage. Just rename it to uzImage.bin and copy it to the boot partition of your SD card. Next, we will build the kernel modules:

make modules

And finally, we have to install the modules. If you have built them in your WM8650 netbook, run, with root privileges:

make modules_install

If you have built them in your PC using a cross compiler, mount the system partition of the SD card and run (also with root privileges):

INSTALL_MOD_PATH=/run/media/doragasu/ARCH_SYS make modules_install

As always, remember to change "/run/media/doragasu/ARCH_SYS" with the directory where the system partition of your SD card is mounted. And that's all, reboot your netbook, and the new kernel and modules should run fine. If you have included new features in your kernel, they should be working from now on!

When I get some more time, I'll write a tutorial detailing how to include the driver for the RT8188/8192 wireless dongles into the kernel tree. Stay tuned!

Tuesday, June 19, 2012

Arch Linux on a WM8650 netbook (II)

UPDATE 20th November 2012: Due to recent changes in the Arch Linux boot process, this tutorial is no longer valid. You can still download an old pre-built image and install it, as I explain below. But with this old image, updating the distro (with pacman -Syu) will most likely throw some errors and maybe even break the system. Also installing applications without updating the distro (with pacman -S application_name) will likely fail because of the not updated dependencies.

In my previous post, we learned about these cheap ARM netbooks, and how to install a base Arch Linux system in one of them. If you are interested in this topic, and haven't read it, be sure to give it a look.

In this post, I'll show you how to install and configure LXDE desktop environment and the network manager daemon. If you're too impatient, too busy or too lazy, just grab the full system image (319 MiB) here or here. Then follow the first two steps I wrote in my previous post, and untar the downloaded file, by running (as root):

tar -xjf alarm-wm8650-2012.06.19.tar.bz2 -C /run/media/doragasu/ARCH_SYS/

Make sure you replace "/run/media/doragasu/ARCH_SYS/" with the directory where the Arch Linux system partition is mounted. Insert the SD card in your netbook and power it on. Arch Linux should boot as shown in this video:


You can login as the root user (login: root, password: root), and you can also login as a non privileged (but included in the sudoers) user (login: user, password: user). Remember to edit rc.conf to at least set the timezone, or you'll get the wrong time.

If you want to do it the long way, and you are an Arch Linux newbie, just follow me (or search in the essential Arch Linux Wiki). If you are an Arch Linux hardcore user, just skip this post, what I'm going to tell you is 100% standard Arch Linux, you don't need to do weird tricks or hacks like we did while installing the base system.

Desktop Environment Installation

Click to watch LXDE in all its glory
  1. Let's start installing the X-Window system. Start your netbook and login as root. If you have configured the network, I recommend loging in through SSH, to be able to easily copy and paste the commands from this post. It's also recommended to update the entire system before starting (pacman -Syu). Once you are logged in and the system is updated, start installing packages:
pacman -S xorg-server xorg-xinit xorg-utils xorg-server-utils xf86-video-fbdev
  1. If you did not add dbus to the daemons list, do it now. Edit /etc/rc.conf and add it. The daemons list should look like this:
DAEMONS=(hwclock syslog-ng network crond sshd dbus)
  1. Install the desktop environment. Here you have to choose among all the available. The most used are Gnome, KDE, XFCE and LXDE. I will detail how to install LXDE. I chose LXDE because it has a great advantage over KDE and Gnome: it may not look as eye candy as them, but requires a lot less resources. XFCE is also a good choice for machines low on resources, but I'll not detail how to install it. If you want to give XFCE a try, read its wiki page. Let's continue installing LXDE:
pacman -S lxde gamin
  1. Configure the desktop environment for the current user. You'll have to repeat this step for every user you want to be able to start a LXDE session:
mkdir -p ~/.config/openbox
cp /etc/xdg/openbox/menu.xml /etc/xdg/openbox/rc.xml /etc/xdg/openbox/autostart ~/.config/openbox
  1. Configure the session start for each user. Create a .xinitrc file in the home of each user, with the following contents:
#!/bin/sh
exec startlxde
  1. make sure .xinitrc is executable:
chmod +x .xinitrc
  1. Manually start the X session:
startx
  1. So far, the desktop environment should be working. You should see the XFCE desktop with its bottom panel. Everything should work, but... text rendering looks like crap, right? No problem, you can solve it by typing two commands:
pacman -S ttf-bitstream-vera ttf-dejavu ttf-droid ttf-freefont
fc-cache -vf
  1. You can install some commonly used programs:
pacman -S leafpad epdfview galculator abiword
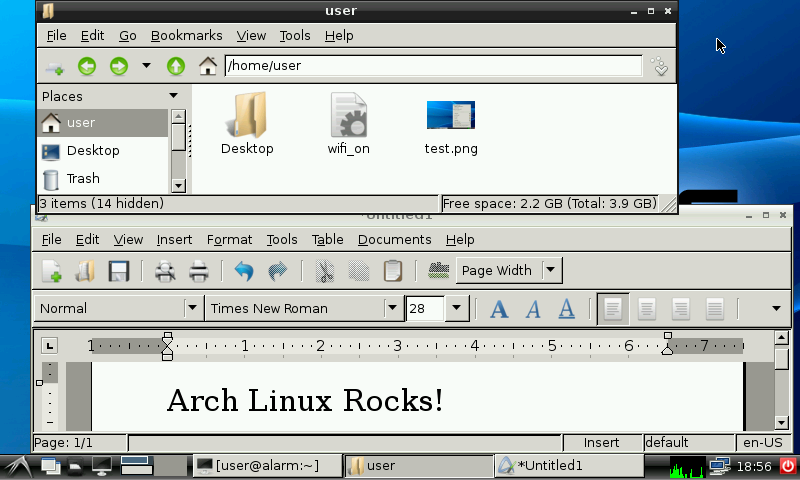
PCManFM and AbiWord
  1. If you want to use a graphical login manager, you can install for example SLiM:
pacman -S slim
  1. To make slim start each boot, edit /etc/rc.conf and add slim to the daemons list, after dbus. This list should look like:
DAEMONS=(hwclock syslog-ng network crond sshd dbus slim)

Reboot and you should be greeted by the login screen! Remember you have to repeat steps 4, 5 and 6 for each user you want to be able to use LXDE.

Network Manager daemon

Network manager applet in action
If you are going to use a desktop environment, it's highly recommended to replace the network daemon with networkmanager one. This will ease a lot network configuration.
  1. Install networkmanager, the applet for the desktop panel, and gnome-keyring to store passwords for the wireless networks:
pacman -S networkmanager network-manager-applet xfce4-notifyd hicolor-icon-theme gnome-icon-theme gnome-keyring
  1. Replace network daemon with networkmanager. Make sure networkmanager is placed after dbus. The daemons list should look like this:
DAEMONS=(hwclock syslog-ng crond sshd dbus networkmanager slim)
Now if you reboot and enable WiFi (gpio 1:6:d8110040:d8110080:d81100c0), you should be able to select a wireless network and connect to it using the network manager applet, to the right of the bottom panel.
  1. You want to surf the net, right? Unfortunately, this netbook is extremely low on RAM (256 MiB). Most commonly used browsers (Firefox and Chromium) eat lots of RAM, so it's recommended to use lighter browsers, like Midori and Links. Links is very fast and has a very low memory footprint. Unfortunately, it's extremely non Acid3 test friendly: it doesn't support javascript and will not render properly most web pages (though most of them will be usable). Midori is a full featured browser, slower than Links, but can display most webpages failing in Links. To install these browsers, type:
pacman -S links midori

Links browser. Ugly but functional
Midori browser running fullscreen
Of course you can install a lot more network related stuff. Do you want to connect to the IRC? install irssi. Do you want to chat using gtalk, MSN, AIM, etc? install pidgin. Do you want to connect to a remote VNC desktop? install tightvnc, etc.
This concludes today's post. I hope you enjoyed Arch Linux the same as I do. It's a great distro and can make these cheap and tiny netbooks useful for lots of interesting projects!

Monday, June 18, 2012

Arch Linux on a WM8650 netbook

UPDATE 20th November 2012: Due to recent changes in the Arch Linux boot process, this tutorial is no longer valid. You can still download an old pre-built image and install it, as I explained here. But with this old image, updating the distro (with pacman -Syu) will most likely throw some errors and maybe even break the system. Also installing applications without updating the distro (with pacman -S application_name) will likely fail because of the not updated dependencies.

If you have searched the net for a very cheap tablet, maybe you have seen a lot of  7" chinese ones featuring the WM8650 SoC. This SoC has an ARM9 CPU running at 800 MHz, a DSP, a 2D graphics accelerator and a lot of peripherals.


I don't like tablets at all, but I found some cheap chinese netbooks containing pretty much the same hardware, removing the touchscreen and replacing it with a keyboard + touchpad. I couldn't resist and bought one of these netbooks in Aliexpress. It costed me around 50€, shipping costs included. The specs of this machine are:
  • Wondermedia WM8650 SoC at 800 MHz.
  • 256 MiB DDR RAM (I think it runs @ 800 MHz, but I'm not sure).
  • 2 GB internal NAND Flash.
  • 7" 800x480 pixels TFT screen.
  • 3 USB Host ports.
  • 1 Ethernet port.
  • WiFi.
  • Headphones and microphone ports.
  • Internal 7,4V 1800mAh LiPo battery.
  • 9V 1,5A power adapter.
  • Android 2.2.

The Android distro that comes pre-installed is pretty usable even without a touchscreen. As the specs of this machine are really far from being impressive, it doesn't run butter smooth, but works very well.

Android is OK, but as an Arch Linux fan I am, I wanted to make this netbook run it, so I started searching the net to see if anybody had already made it. The only thing I found was a Debian port for these netbooks, using the kernel from a preinstalled Android distro. This Debian port works, but isn't very well optimized, and for example, boot time takes almost 2 long minutes.


The closest thing I found is an Arch Linux port for a WM8650 based tablet. This tutorial is really great and very well detailed, and my work getting the kernel built is almost entirely based on it. John has made a really good job getting the Linux kernel built for these tablets.

In this post, I will detail the process I have followed to get a base Arch Linux system running in this netbook, but I will skip the kernel build process (maybe I'll detail it in a later blog post).

OK, let's get our hands dirty. You will need a SD card. The minimum required size of the SD card is 2 GB, but I recommend using at least a 4GB card, unless you don't need a desktop environment. The steps to get Arch Linux running are:

  1. Partition and format the card. To do it, I have used gparted application. First create a very small FAT32 partition, and name it BOOT. The smallest partition gparted allowed me to create was 33 MiB, more than enough (we need less than 4 MiB). Then create a ext3 partition using the remaining space, and label it ARCH_SYS.
Partitions created in the SD card
  1. Copy the boot script (wmt_scriptcmd) and kernel (uzImage.bin) to the BOOT partition. Download them here. Then run:
tar -xjf alarm-wm8650-boot.tar.bz2 -C /run/media/doragasu/BOOT/
Make sure to replace "/run/media/doragasu/BOOT/" with the directory where the BOOT partition of the SD card is mounted.
  1. Download the root filesystem and untar it in the ARCH_SYS partition:
wget http://archlinuxarm.org/os/ArchLinuxARM-armv5te-latest.tar.gz
tar -xzf ArchLinuxARM-armv5te-latest.tar.gz -C /run/media/doragasu/ARCH_SYS/
Make sure you replace "/run/media/doragasu/ARCH_SYS/" with the directory where the Arch Linux system partition is mounted, here and from now on. Also make sure to run it as root (write sudo before the tar command if you are not root).
  1. Copy the kernel modules to the ARCH_SYS partition. Download them here, and run (as root):
tar -xjf alarm-wm8650-modules.tar.bz2 -C /run/media/doragasu/ARCH_SYS/
  1. We are ready for the first boot. Unmount the SD card, insert it in the netbook and power it on. You should see the Android robot, and then the messages Loading Kernel... and Starting Linux... should appear. In a few seconds, you should be able to see the boot messages, and finally get the login prompt. The first boot will take a lot of time because udev has some problems and eats almost all the CPU. We will fix these proplems in the next step. Default password for the root user is root.
  2. Udev needs the accept4() OS call, that is not supplied by the Android kernel I have built. To fix this, you have to install libaccept4. Download this package and put it inside the SD card (for example in /root). Then start Linux, login as root and in the console change to the directory containing the downloaded package and type:
pacman -U libaccept4-570-1-arm.pkg.tar.xz
echo /usr/local/lib/libaccept4.so >> /etc/ld.so.preload
Accept the installation of the library, and reboot. Udev should be working fine from now on, and boot time will be a lot shorter.
  1. To extend battery life, power to the internal WiFi dongle is off by default. To enable it, you need to toggle the GPIO pin controlling its power. Download this package, copy it to the SD and install it with the following command:
pacman -U wmt-gpio-1.0-1-arm.pkg.tar.xz
Upon installing this package, to enable the WiFi chip, you have to input the command:
gpio 1:6:d8110040:d8110080:d81100c0

And to disable the WiFi chip:

gpio 0:6:d8110040:d8110080:d81100c0
You can create two scripts with these commands, or if you always use WiFi, you can add the first one to /etc/rc.local, to enable WiFi each time the system boots.
  1. To read the battery charge level, use the following command:
cat /sys/class/power_supply/wmt-battery/capacity
  1. To change the screen brightness, you have to write a number between 0 and 255 (the greater, the brighter) to /sys/class/leds/lcd-backlight/brightness. For example:
echo 200 > /sys/class/power_supply/wmt-battery/capacity
You can also add this line to rc.local to set the screen brightness to your favorite level each time the system boots.

Now you have a fully functional base Arch Linux install. It's highly recommended to update your system (pacman -Syu). Then you can start installing your favorite utilities, window manager, etc., by following the instructions documented in the awesome Arch Linux Wiki.

I'll give you some hints for Arch Linux newbies. Skip them all if you are experienced with this distro. You can start by editing /etc/rc.conf. This file contains some basic configuration parameters, like for example the timezone (TIMEZONE), the hostname (HOSTNAME) and some basic network configuration parameters (that default to DHCP on the Ethernet port). Very important in this file is the last line, detailing the services started when the system boots, and the order in which they are started. I usually remove netfs from the list, replace network with networkmanager (you'll have to install it first) and add dbus (you'll need it for the window manager and some more programs). If you use networkmanager instead of network daemon, make sure you put it after dbus.

To set the locale (in case you don't want the default en_US.UTF8), you have to follow these steps:
  1. Edit /etc/locale.gen. This file details the locales generated by the system. You can replace/add the desired locales to this file. For example, to generate locales for spanish language, add:
es_ES.UTF-8 UTF-8  
es_ES ISO-8859-1  
es_ES@euro ISO-8859-15  
  1. Generate the new locales by running (with root privileges):
locale-gen
  1. Edit /etc/rc.conf and change the default locale to the desired one. Of course, the locale must be one of the included in /etc/rocale.gen. For example, for spanish:
LOCALE=es_ES.UTF-8

To change the root password, use the command passwd. To create a new user, use the command adduser. Leave the default parameters, but when asked for additional groups, enter the following:
audio,lp,storage,video,wheel,games,power,scanner

It's highly recommended to install sudo and add the user to the sudoers. Just follow these steps:
  1. Install sudo:
pacman -S sudo
  1. Allow all the users in the wheel group to use sudo. Run the visudo command, and uncomment  (remove the '#') the following line:
# %wheel ALL=(ALL) ALL
If you don't know how to use the vi editor, press the [I] key to [I]nsert text, when you finish, press [ESC] to enter command mode and write :wq to write the file and quit the editor. If you mess something up, just press [ESC] to switch to command mode, and write :!q to quit without saving changes. Then try again the visudo command.
And that's all for today. If you followed this tutorial to the end, congratulations! You should be able to launch GNU/Linux in your shiny WM8650 laptop, with the locale, timezone and (hopefully) Ethernet network properly configured. You should be also able to login as a non privileged user, and use sudo to run tasks as root. If you have questions, feel free to ask them.

What? You don't like the console? Don't worry. In the next chapter, we will learn how to install a graphical desktop environment. Stay tuned!

TROUBLESHOOTING:

I have patched the kernel to make it compatible with the environment of the Android distro that comes pre-installed in some netbooks. You should be able to boot Android (without the SD card inserted) and GNU/Linux (with the SD card inserted). It works on my netbook, but it looks like there are different hardware revisions of these netbooks, and some of them, may require to change some variables in the environment stored inside the internal Flash memory. Typical problems that may arise are for example not being able to use the Ethernet port, or losing the ability to read the internal battery level. If you experience these problems, I can provide you with a modified wmt_scriptcmd that changes some variables of the environment stored in Flash, to make the broken things work. But I'll not post it here unless someone asks for it, because if you overwrite some variables, you may break things in the Android kernel (i.e. you can loose the battery level information in Android). And if you didn't back up that variables first, you might not be able to fix these problems.

Other problem that may arise, is that WiFi may not work. WiFi in these netbooks is implemented using an internal USB WiFi dongle. The one used in my unit has a Realtek RT8188CU chipset. I had to search the net for a compatible driver (rtl8192cu) and merge it into the kernel drivers. If your netbook uses a dongle with a different chipset, WiFi may not work. Enable WiFi with the gpio command, run lsusb and show me its output. I'll try to help you to get the dongle working.

Of course you may find a lot more problems. Feel free to ask for help! You can also read the follow-up to this post: Arch Linux on a WM8650 netbook (II).