Sunday, September 2, 2012

Making an IP webcam using an old router


Recently I got my hands on an old Comtrend CT536+ router. It wasn't working. When turned on, some times it worked for a while, but most of the times it just didn't even boot. I decided to try fixing it, so I opened the unit, had a look at its internals and found two capacitors in the power source with a slight bulging. These capacitors could be victims of the annoying capacitor plague, so I replaced them with new low ESR ones and... the router started working!

One of the damaged capacitors next to the two new ones

Installing a USB Host port

Since I took the trouble to open the router, I decided to add some enhancements. The components for the USB Host were not populated in the PCB, so I added a USB Host connector, a capacitor, some SMD resistors and some wiring to get the extremely useful USB Host port. I also added some wires to connect a 3.3V UART, just in case I need to access the GNU+Linux console.

USB mod

Finally I used a file to enlarge the hole for the Ethernet ports in the back of the router, to make room for the new connector. This is how the back of the router looks like now:

The new USB Host connector, ready to be tested

WARNING: Before you plug anything to the new USB Host, you must have in mind the 5V for the host are provided by a 78L05 linear regulator. This regulator was already populated inside the router (I don't know why, because it's only used for the USB Host) and can only supply 100 mA. Some USB devices can draw up to 500 mA, so you have to be careful. Only plug devices drawing less than 100 mA. If you need to plug something needing more juice, use a self-powered USB Hub to plug it, or remove the 78L05 regulator and add a bigger one.

Router internals, including the USB mod

Installing OpenWrt and USB Host driver

Unfortunately, the USB Host port is useless with the firmware that comes with the router. The solution to this problem is installing OpenWrt, a GNU+Linux distro suited for routers. Installation process for this router is dead easy, because it can be done directly using the Firmware Update function in the router configuration web page. Just download the OpenWrt image for this router and point it to the Firmware Update page.

After installing OpenWrt, it's recommended to configure the network. There are tons of ways of doing it, depending on your setup. Just have a look to the OpenWrt Wiki. You can also ask in the forum.

Once you have network working, to get the USB Host working, you have to install the host controller kernel module. The host controller in my router is an OHCI one. Other routers may have a different host controller (UHCI or EHCI). To install the OHCI host controller driver, access the router using SSH and use OPKG package manager:
opkg update
opkg install kmod-usb-ohci
The driver should be automatically loaded by the kernel, but if it is not, you can load it entering the command:
insmod usb-ohci
You can plug some USB stuff and have a look to the kernel messages (dmesg) to see if it's working. If you need to use the useful lsusb command, you can install usbutils package, but don't do it unless needed, because these routers usually have an extremely reduced storage (CT536+ only has 4 MB), so installing stuff can easily fill it.

Installing the webcam drivers

Now we can try getting the webcam working. To stream the video I use mjpg-streamer. But before using it, we have to configure the webcam. Supported webcams can be sorted in two families:

  1. The ones that have UVC support.
  2. The ones that have SPCA support.

I have tried two webcams. The first is this one I bought at DealExtreme. lsusb command lists it as Aveo Technology Corp (1871:0142). It supports UVC profile. The second one is a Logitech QuickCam for Notebooks (046d:08dd). It's supported by SPCA.

To get UVC webcams working, just install kmod-video-uvc package:
opkg install kmod-video-uvc
To get SPCA webcams working, you have to find its driver first. Search it inside this list. For example, for my Logitech webcam, the driver is zc3xx, so I have to install kmod-video-gspca-core + kmod-video-gspca-zc3xx:
opkg install kmod-video-gspca-core kmod-video-gspca-zc3xx

mjpg-streamer

Once you have the drivers for your webcam installed, plug it in the USB port and have a look to the kernel messages (dmesg) to see if it's properly recognized. If everything is OK, install mjpg-streamer:
opkg install mjpg-streamer
You can configure some mjpg-streamer parameters by editing /etc/config/mjpg-streamer. To start mjpg-streamer daemon, use the comand:
/etc/init.d/mjpg-streamer start
You can also enable it so it will be automatically started each boot, using the command:
/etc/init.d/mjpg-streamer enable
Once it's running, to watch the video captured by the webcam and streamed through mjpg-streamer, launch for example VLC media player, and select Media/Open Network Stream... (Ctrl+N). Then in the dialog enter the URL: http://<ip_address_of_the_router>:8080/?action=stream and click the Play button. Of course replace <ip_address_of_the_router> with the address (or dns name) matching your router. You should be able to see the video stream. Congratulations! You can also input that URL in any browser and it should work. It worked for me in Firefox 15 and Opera, but Chromium 21 displayed only a still image. The router can be configured as a wireless/wired IP webcam, and it retains its old functionality, so it still can be used as a standard router!
Opening network streams using VLC

You might wonder which driver is better: SPCA or UVC. These are my findings:
  • Using SPCA with the Logitech webcam, I got a very good framerate at 640x480 resolution. As this camera supported the MJPEG profile, mjpg-streamer only has to encapsulate the frames captured by the camera and send them. With this camera, router CPU usage is very low (around 5%).
  • Using UVC with the Aveo webcam I could only get 320x240 resolution and a very poor framerate (around 1 fps, I think). This camera only supports YUYV profile, so mjpg-streamer has to transcode the image captured by the camera. Even with the poor resolution and framerate, router CPU usage with this webcam is higher (around 15-20% with default compression quality). I wasn't able to make this webcam work with higher resolution/framerate.
Maybe the driver used (either SPCA or UVC) doesn't matter, but to avoid image transcoding, I suppose cameras supporting the MJPEG profile are preferred over the ones not supporting it.

Troubleshooting:

If your webcam supports only the YUYV profile (like my Aveo webcam), you will have to explicitly tell mjpg-streamer to use this profile, or it will not start. Edit /etc/init.d/mjpg-streamer and add the -y switch to the --input section. The line in which mjpg-streamer is called (the last line in the start{} section) should look like:
    [ $enabled -gt 0 -a -c $device ] && sleep 3 && $SSD -S -m -p $PIDF -q -x $PROG -- --input "input_uvc.so -y --device $device --fps $fps --resolution $resolution" --output "output_http.so --port $port" &
Note the -y switch after input_uvc.so, that enables YUYV mode.

Saturday, September 1, 2012

Arch Linux for WM8650 kernel/modules update

I got some time to update my build of the kernel and modules for the WM8650 netbooks. The main features of the updated kernel and modules are:
  • Includes all my previous patches to improve Ethernet compatibility, get battery readings, remove  some nasty debug messages, etc.
  • I have included a lot of drivers missing in my first builds: more wireless dongles, Bluetooth dongles, USB to serial adapters, ipv6, etc.
You can grab the updated kernel (and wmt_scriptcmd) here, and the updated kernel modules here. Extract the kernel to the root of the BOOT partition and the kernel modules to the root of the ARCH_SYS partition (as explained on steps 2 and 4 here).

I had no time to make modifications to the RT5370 driver to build it inside the kernel tree, so it's not included in the kernel modules I posted above. But don't panic, finally I got it to build, and it looks like it's working. I have not an RT5370 dongle to test if it works, but now insmod returns no errors when I load the module, so I suppose it should work. To install this module, first download it here. Then insert the SD card in your computer and unpack the driver (as usual replace /run/media/doragasu/ARCH_SYS/ with the path where the system partition of the SD card is mounted):
tar -xjf wm8650-rt5370_driver.tar.bz2 -C /run/media/doragasu/ARCH_SYS/
Then boot ArchLinux in your netbook and load the module using insmod (with root privileges):
insmod /lib/modules/2.6.32.9-test/kernel/drivers/net/wireless/rt5370sta.ko
As usual you can add this line to /etc/rc.local if you want the module to load each boot. You can also create a script lo load it whenever you want. Don't forget to enable the module with the gpio command!

In my netbook the module loads perfectly and outputs these messages:
rtusb init rt2870 --->
usbcore: registered new interface driver rt2870
Note the driver is the same for RT2870 and RT5370 chipsets. If you try this driver, please confirm if it works.

I also wanted to upgrade the entire distro to the latest version, but unfortunately I'm pretty busy and I have no time to do it. It was nice playing with this netbook, but I'd like to move to other projects, so I think I will not be releasing updates for it anymore.

I hope this updated kernel solves most of the problems with Ethernet, drivers, etc.

Enjoy!

Sunday, June 24, 2012

Building WM8650 netbook kernel

So you bought a WM8650 netbook, followed my previous posts and got Arch Linux working, but... the WiFi dongle inside your netbook is not a RT8188 one, or you need ipv6 support, or you want NFS support, or maybe you want to mess with the kernel code to fix some issues. Then you need to build a new kernel.

To build the kernel, I followed this great tutorial by John Williams. All the credit for finding the kernel sources and investigating how to patch them is due to him. I only did some small modifications to support WM8650 netbooks (his tutorial covers WM8650 tablets) and to avoid changing kernel variables that could break compatibility with Android Kernel. The kernel I'll show you how to build, lacks the WiFi driver. If the USB dongle inside your netbook is supported by the drivers included in the kernel, you can enable it and it will be built. If it's not supported (as happened with mine), you'll need to search for a suitable driver, and merge it in the kernel sources. I'll explain how to do it when I get some time to write a new tutorial.

The infamous menuconfig screen

You will need a compiler. You can install gcc and binutils in your WM8650 netbook and do all the process inside it. Building the kernel in the netbook takes about 15 minutes. You can also build it in your PC using a cross compiler for armv5te architecture. This will take a lot less time, but getting the compiler working can be a bit tricky. I'll not explain how to build/install a cross compiler, since there are a lot of good tutorials covering it, all over the net.

Once you have your compiler set up, we can start working. The first step is downloading the sources. Unfortunately the sources for the kernel that come with the Android distro aren't easy to find. There are some sources from Wondermedia available, but they lack the code for some drivers, and also include some binary blobs. An older version of the kernel sources included some of the missing drivers, and can still be found on the Internet. The first thing we must do is to download sources for both the older and the newer kernel, then unpack the older kernel and then unpack the newer kernel overwriting the older one. This way we get the drivers missing in the newer kernel, but with all the bugfixes and improvements of the newer kernel. Then we must clean the kernel tree:

wget http://ftp.gpl-devices.org/pub/vendors/Wondermedia/WM8650/KERNEL-DS_ANDROID_2.6.32_WM8650.111209.1514.tgz
wget http://projectgus.com/files/wm8650/KERNEL-DS_ANDROID_2.6.32_WM8650.110408.1903.tgz
tar -xzf KERNEL-DS_ANDROID_2.6.32_WM8650.110408.1903.tgz
tar -xzf KERNEL-DS_ANDROID_2.6.32_WM8650.111209.1514.tgz
cd ANDROID_2.6.32-DS/ANDROID_2.6.32
make distclean

Now we must set the kernel configuration and patch the kernel with the code to fix battery readings, ethernet, etc. Download this patch to the working directory and type in the console:

tar -xjf wm8650_netbook.patch.tar.bz2
patch -p1 < wm8650_netbook.patch
wget http://pastebin.com/download.php?i=UBZW78BW -O .config

If you want to change the kernel configuration, launch the menu based configurator:

make menuconfig

Once you finish, exit (saving changes if you want). We are ready to start building the kernel:

make uImage

This will take some time. Hopefully, there should be no errors, and when it finishes, you should have your new kernel under arch/arm/boot/uImage. Just rename it to uzImage.bin and copy it to the boot partition of your SD card. Next, we will build the kernel modules:

make modules

And finally, we have to install the modules. If you have built them in your WM8650 netbook, run, with root privileges:

make modules_install

If you have built them in your PC using a cross compiler, mount the system partition of the SD card and run (also with root privileges):

INSTALL_MOD_PATH=/run/media/doragasu/ARCH_SYS make modules_install

As always, remember to change "/run/media/doragasu/ARCH_SYS" with the directory where the system partition of your SD card is mounted. And that's all, reboot your netbook, and the new kernel and modules should run fine. If you have included new features in your kernel, they should be working from now on!

When I get some more time, I'll write a tutorial detailing how to include the driver for the RT8188/8192 wireless dongles into the kernel tree. Stay tuned!

Tuesday, June 19, 2012

Arch Linux on a WM8650 netbook (II)

UPDATE 20th November 2012: Due to recent changes in the Arch Linux boot process, this tutorial is no longer valid. You can still download an old pre-built image and install it, as I explain below. But with this old image, updating the distro (with pacman -Syu) will most likely throw some errors and maybe even break the system. Also installing applications without updating the distro (with pacman -S application_name) will likely fail because of the not updated dependencies.

In my previous post, we learned about these cheap ARM netbooks, and how to install a base Arch Linux system in one of them. If you are interested in this topic, and haven't read it, be sure to give it a look.

In this post, I'll show you how to install and configure LXDE desktop environment and the network manager daemon. If you're too impatient, too busy or too lazy, just grab the full system image (319 MiB) here or here. Then follow the first two steps I wrote in my previous post, and untar the downloaded file, by running (as root):

tar -xjf alarm-wm8650-2012.06.19.tar.bz2 -C /run/media/doragasu/ARCH_SYS/

Make sure you replace "/run/media/doragasu/ARCH_SYS/" with the directory where the Arch Linux system partition is mounted. Insert the SD card in your netbook and power it on. Arch Linux should boot as shown in this video:


You can login as the root user (login: root, password: root), and you can also login as a non privileged (but included in the sudoers) user (login: user, password: user). Remember to edit rc.conf to at least set the timezone, or you'll get the wrong time.

If you want to do it the long way, and you are an Arch Linux newbie, just follow me (or search in the essential Arch Linux Wiki). If you are an Arch Linux hardcore user, just skip this post, what I'm going to tell you is 100% standard Arch Linux, you don't need to do weird tricks or hacks like we did while installing the base system.

Desktop Environment Installation

Click to watch LXDE in all its glory
  1. Let's start installing the X-Window system. Start your netbook and login as root. If you have configured the network, I recommend loging in through SSH, to be able to easily copy and paste the commands from this post. It's also recommended to update the entire system before starting (pacman -Syu). Once you are logged in and the system is updated, start installing packages:
pacman -S xorg-server xorg-xinit xorg-utils xorg-server-utils xf86-video-fbdev
  1. If you did not add dbus to the daemons list, do it now. Edit /etc/rc.conf and add it. The daemons list should look like this:
DAEMONS=(hwclock syslog-ng network crond sshd dbus)
  1. Install the desktop environment. Here you have to choose among all the available. The most used are Gnome, KDE, XFCE and LXDE. I will detail how to install LXDE. I chose LXDE because it has a great advantage over KDE and Gnome: it may not look as eye candy as them, but requires a lot less resources. XFCE is also a good choice for machines low on resources, but I'll not detail how to install it. If you want to give XFCE a try, read its wiki page. Let's continue installing LXDE:
pacman -S lxde gamin
  1. Configure the desktop environment for the current user. You'll have to repeat this step for every user you want to be able to start a LXDE session:
mkdir -p ~/.config/openbox
cp /etc/xdg/openbox/menu.xml /etc/xdg/openbox/rc.xml /etc/xdg/openbox/autostart ~/.config/openbox
  1. Configure the session start for each user. Create a .xinitrc file in the home of each user, with the following contents:
#!/bin/sh
exec startlxde
  1. make sure .xinitrc is executable:
chmod +x .xinitrc
  1. Manually start the X session:
startx
  1. So far, the desktop environment should be working. You should see the XFCE desktop with its bottom panel. Everything should work, but... text rendering looks like crap, right? No problem, you can solve it by typing two commands:
pacman -S ttf-bitstream-vera ttf-dejavu ttf-droid ttf-freefont
fc-cache -vf
  1. You can install some commonly used programs:
pacman -S leafpad epdfview galculator abiword
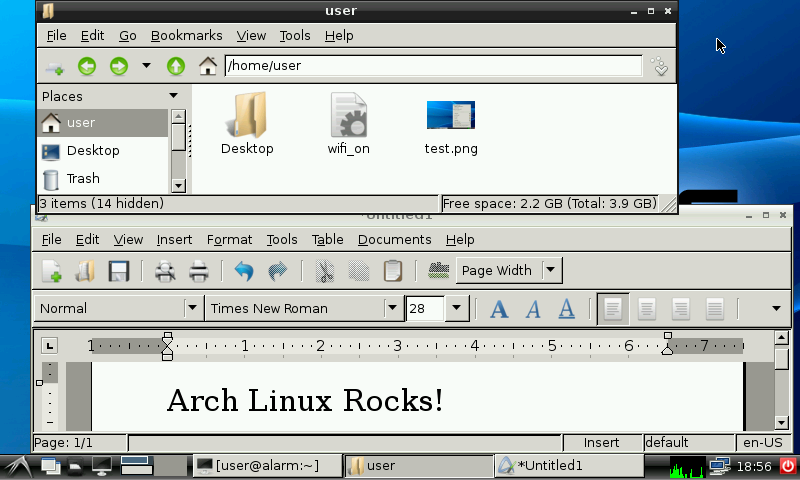
PCManFM and AbiWord
  1. If you want to use a graphical login manager, you can install for example SLiM:
pacman -S slim
  1. To make slim start each boot, edit /etc/rc.conf and add slim to the daemons list, after dbus. This list should look like:
DAEMONS=(hwclock syslog-ng network crond sshd dbus slim)

Reboot and you should be greeted by the login screen! Remember you have to repeat steps 4, 5 and 6 for each user you want to be able to use LXDE.

Network Manager daemon

Network manager applet in action
If you are going to use a desktop environment, it's highly recommended to replace the network daemon with networkmanager one. This will ease a lot network configuration.
  1. Install networkmanager, the applet for the desktop panel, and gnome-keyring to store passwords for the wireless networks:
pacman -S networkmanager network-manager-applet xfce4-notifyd hicolor-icon-theme gnome-icon-theme gnome-keyring
  1. Replace network daemon with networkmanager. Make sure networkmanager is placed after dbus. The daemons list should look like this:
DAEMONS=(hwclock syslog-ng crond sshd dbus networkmanager slim)
Now if you reboot and enable WiFi (gpio 1:6:d8110040:d8110080:d81100c0), you should be able to select a wireless network and connect to it using the network manager applet, to the right of the bottom panel.
  1. You want to surf the net, right? Unfortunately, this netbook is extremely low on RAM (256 MiB). Most commonly used browsers (Firefox and Chromium) eat lots of RAM, so it's recommended to use lighter browsers, like Midori and Links. Links is very fast and has a very low memory footprint. Unfortunately, it's extremely non Acid3 test friendly: it doesn't support javascript and will not render properly most web pages (though most of them will be usable). Midori is a full featured browser, slower than Links, but can display most webpages failing in Links. To install these browsers, type:
pacman -S links midori

Links browser. Ugly but functional
Midori browser running fullscreen
Of course you can install a lot more network related stuff. Do you want to connect to the IRC? install irssi. Do you want to chat using gtalk, MSN, AIM, etc? install pidgin. Do you want to connect to a remote VNC desktop? install tightvnc, etc.
This concludes today's post. I hope you enjoyed Arch Linux the same as I do. It's a great distro and can make these cheap and tiny netbooks useful for lots of interesting projects!

Monday, June 18, 2012

Arch Linux on a WM8650 netbook

UPDATE 20th November 2012: Due to recent changes in the Arch Linux boot process, this tutorial is no longer valid. You can still download an old pre-built image and install it, as I explained here. But with this old image, updating the distro (with pacman -Syu) will most likely throw some errors and maybe even break the system. Also installing applications without updating the distro (with pacman -S application_name) will likely fail because of the not updated dependencies.

If you have searched the net for a very cheap tablet, maybe you have seen a lot of  7" chinese ones featuring the WM8650 SoC. This SoC has an ARM9 CPU running at 800 MHz, a DSP, a 2D graphics accelerator and a lot of peripherals.


I don't like tablets at all, but I found some cheap chinese netbooks containing pretty much the same hardware, removing the touchscreen and replacing it with a keyboard + touchpad. I couldn't resist and bought one of these netbooks in Aliexpress. It costed me around 50€, shipping costs included. The specs of this machine are:
  • Wondermedia WM8650 SoC at 800 MHz.
  • 256 MiB DDR RAM (I think it runs @ 800 MHz, but I'm not sure).
  • 2 GB internal NAND Flash.
  • 7" 800x480 pixels TFT screen.
  • 3 USB Host ports.
  • 1 Ethernet port.
  • WiFi.
  • Headphones and microphone ports.
  • Internal 7,4V 1800mAh LiPo battery.
  • 9V 1,5A power adapter.
  • Android 2.2.

The Android distro that comes pre-installed is pretty usable even without a touchscreen. As the specs of this machine are really far from being impressive, it doesn't run butter smooth, but works very well.

Android is OK, but as an Arch Linux fan I am, I wanted to make this netbook run it, so I started searching the net to see if anybody had already made it. The only thing I found was a Debian port for these netbooks, using the kernel from a preinstalled Android distro. This Debian port works, but isn't very well optimized, and for example, boot time takes almost 2 long minutes.


The closest thing I found is an Arch Linux port for a WM8650 based tablet. This tutorial is really great and very well detailed, and my work getting the kernel built is almost entirely based on it. John has made a really good job getting the Linux kernel built for these tablets.

In this post, I will detail the process I have followed to get a base Arch Linux system running in this netbook, but I will skip the kernel build process (maybe I'll detail it in a later blog post).

OK, let's get our hands dirty. You will need a SD card. The minimum required size of the SD card is 2 GB, but I recommend using at least a 4GB card, unless you don't need a desktop environment. The steps to get Arch Linux running are:

  1. Partition and format the card. To do it, I have used gparted application. First create a very small FAT32 partition, and name it BOOT. The smallest partition gparted allowed me to create was 33 MiB, more than enough (we need less than 4 MiB). Then create a ext3 partition using the remaining space, and label it ARCH_SYS.
Partitions created in the SD card
  1. Copy the boot script (wmt_scriptcmd) and kernel (uzImage.bin) to the BOOT partition. Download them here. Then run:
tar -xjf alarm-wm8650-boot.tar.bz2 -C /run/media/doragasu/BOOT/
Make sure to replace "/run/media/doragasu/BOOT/" with the directory where the BOOT partition of the SD card is mounted.
  1. Download the root filesystem and untar it in the ARCH_SYS partition:
wget http://archlinuxarm.org/os/ArchLinuxARM-armv5te-latest.tar.gz
tar -xzf ArchLinuxARM-armv5te-latest.tar.gz -C /run/media/doragasu/ARCH_SYS/
Make sure you replace "/run/media/doragasu/ARCH_SYS/" with the directory where the Arch Linux system partition is mounted, here and from now on. Also make sure to run it as root (write sudo before the tar command if you are not root).
  1. Copy the kernel modules to the ARCH_SYS partition. Download them here, and run (as root):
tar -xjf alarm-wm8650-modules.tar.bz2 -C /run/media/doragasu/ARCH_SYS/
  1. We are ready for the first boot. Unmount the SD card, insert it in the netbook and power it on. You should see the Android robot, and then the messages Loading Kernel... and Starting Linux... should appear. In a few seconds, you should be able to see the boot messages, and finally get the login prompt. The first boot will take a lot of time because udev has some problems and eats almost all the CPU. We will fix these proplems in the next step. Default password for the root user is root.
  2. Udev needs the accept4() OS call, that is not supplied by the Android kernel I have built. To fix this, you have to install libaccept4. Download this package and put it inside the SD card (for example in /root). Then start Linux, login as root and in the console change to the directory containing the downloaded package and type:
pacman -U libaccept4-570-1-arm.pkg.tar.xz
echo /usr/local/lib/libaccept4.so >> /etc/ld.so.preload
Accept the installation of the library, and reboot. Udev should be working fine from now on, and boot time will be a lot shorter.
  1. To extend battery life, power to the internal WiFi dongle is off by default. To enable it, you need to toggle the GPIO pin controlling its power. Download this package, copy it to the SD and install it with the following command:
pacman -U wmt-gpio-1.0-1-arm.pkg.tar.xz
Upon installing this package, to enable the WiFi chip, you have to input the command:
gpio 1:6:d8110040:d8110080:d81100c0

And to disable the WiFi chip:

gpio 0:6:d8110040:d8110080:d81100c0
You can create two scripts with these commands, or if you always use WiFi, you can add the first one to /etc/rc.local, to enable WiFi each time the system boots.
  1. To read the battery charge level, use the following command:
cat /sys/class/power_supply/wmt-battery/capacity
  1. To change the screen brightness, you have to write a number between 0 and 255 (the greater, the brighter) to /sys/class/leds/lcd-backlight/brightness. For example:
echo 200 > /sys/class/power_supply/wmt-battery/capacity
You can also add this line to rc.local to set the screen brightness to your favorite level each time the system boots.

Now you have a fully functional base Arch Linux install. It's highly recommended to update your system (pacman -Syu). Then you can start installing your favorite utilities, window manager, etc., by following the instructions documented in the awesome Arch Linux Wiki.

I'll give you some hints for Arch Linux newbies. Skip them all if you are experienced with this distro. You can start by editing /etc/rc.conf. This file contains some basic configuration parameters, like for example the timezone (TIMEZONE), the hostname (HOSTNAME) and some basic network configuration parameters (that default to DHCP on the Ethernet port). Very important in this file is the last line, detailing the services started when the system boots, and the order in which they are started. I usually remove netfs from the list, replace network with networkmanager (you'll have to install it first) and add dbus (you'll need it for the window manager and some more programs). If you use networkmanager instead of network daemon, make sure you put it after dbus.

To set the locale (in case you don't want the default en_US.UTF8), you have to follow these steps:
  1. Edit /etc/locale.gen. This file details the locales generated by the system. You can replace/add the desired locales to this file. For example, to generate locales for spanish language, add:
es_ES.UTF-8 UTF-8  
es_ES ISO-8859-1  
es_ES@euro ISO-8859-15  
  1. Generate the new locales by running (with root privileges):
locale-gen
  1. Edit /etc/rc.conf and change the default locale to the desired one. Of course, the locale must be one of the included in /etc/rocale.gen. For example, for spanish:
LOCALE=es_ES.UTF-8

To change the root password, use the command passwd. To create a new user, use the command adduser. Leave the default parameters, but when asked for additional groups, enter the following:
audio,lp,storage,video,wheel,games,power,scanner

It's highly recommended to install sudo and add the user to the sudoers. Just follow these steps:
  1. Install sudo:
pacman -S sudo
  1. Allow all the users in the wheel group to use sudo. Run the visudo command, and uncomment  (remove the '#') the following line:
# %wheel ALL=(ALL) ALL
If you don't know how to use the vi editor, press the [I] key to [I]nsert text, when you finish, press [ESC] to enter command mode and write :wq to write the file and quit the editor. If you mess something up, just press [ESC] to switch to command mode, and write :!q to quit without saving changes. Then try again the visudo command.
And that's all for today. If you followed this tutorial to the end, congratulations! You should be able to launch GNU/Linux in your shiny WM8650 laptop, with the locale, timezone and (hopefully) Ethernet network properly configured. You should be also able to login as a non privileged user, and use sudo to run tasks as root. If you have questions, feel free to ask them.

What? You don't like the console? Don't worry. In the next chapter, we will learn how to install a graphical desktop environment. Stay tuned!

TROUBLESHOOTING:

I have patched the kernel to make it compatible with the environment of the Android distro that comes pre-installed in some netbooks. You should be able to boot Android (without the SD card inserted) and GNU/Linux (with the SD card inserted). It works on my netbook, but it looks like there are different hardware revisions of these netbooks, and some of them, may require to change some variables in the environment stored inside the internal Flash memory. Typical problems that may arise are for example not being able to use the Ethernet port, or losing the ability to read the internal battery level. If you experience these problems, I can provide you with a modified wmt_scriptcmd that changes some variables of the environment stored in Flash, to make the broken things work. But I'll not post it here unless someone asks for it, because if you overwrite some variables, you may break things in the Android kernel (i.e. you can loose the battery level information in Android). And if you didn't back up that variables first, you might not be able to fix these problems.

Other problem that may arise, is that WiFi may not work. WiFi in these netbooks is implemented using an internal USB WiFi dongle. The one used in my unit has a Realtek RT8188CU chipset. I had to search the net for a compatible driver (rtl8192cu) and merge it into the kernel drivers. If your netbook uses a dongle with a different chipset, WiFi may not work. Enable WiFi with the gpio command, run lsusb and show me its output. I'll try to help you to get the dongle working.

Of course you may find a lot more problems. Feel free to ask for help! You can also read the follow-up to this post: Arch Linux on a WM8650 netbook (II).

Sunday, April 22, 2012

The BTKeychain

The BTKeychain is just what its unimaginative name suggests: a keychain with a Bluetooth interface. It's a device I created to solve a problem my wife has: she never remembers where she put her keys. In addition to the Bluetooth interface, the keychain also has a buzzer and a small battery. The Bluetooth interface is always discoverable. This way, if I want to find the keys, I can search the Bluetooth name of the keychain, and then connect to it and make the buzzer beep. You can see the BTKeychain in action in the following video.


Any open device (i.e. anyone you can develop for) with a Bluetooth interface can be used to make the keychain beep. I have coded a script that can be used for this task with any GNU+Linux PC. I have also written a J2ME Java application that should be compatible with any Java enabled phone, and that will make the BTKeychain beep the same way. Of course similar scripts/applications can be developed for Windows, OS-X, Android and iOS devices.

Searching for the keys (sorry about the messages in spanish)

Keys found (sorry about the messages in spanish)
As designing a custom case is expensive, I have used one from one of those cheap photo frame keychains. I threw the original PCB away and took the case and the 180 mA/h LiPo battery. I had to make three holes to the back of the case: one for the status LED, one for the charge LED, and a bigger one for the buzzer output.


Here you can see the designed PCB. It's very small (3cm x 3,5cm) and has the same shape that the original PCB in the photo frame keychain had.


The board has a Bluetooth chip (U1) that includes an internal aerial, a MSP430 microcontroller (U2), a battery charger (U3) and a low drop-out 3.3V linear regulator (U4). The MSP430 microcontroller family was chosen, because this family has the lowest power consumption in the market. Also these microcontrollers are 16-bit, and more powerful than most similar microcontrollers. To make everything fit inside the PCB dimensions, SMD components were used. Passive elements use a 0603 footprint.


If you look closely the photographs, you'll be able to see there's a flaw in the design. The USB connector must be soldered in the opposite side the pads are. So to make it work, you must wire two connections to power the design. Other than this, the board works nice and no more problems have been detected.

In the software side, special care was taken to reach the lowest power consumption possible. The microcontroller is almost always in low power mode (LPM3), and is only awaken when a key is pressed or while the Bluetooth and buzzer are active. The Bluetooth chip requires an external 32 kHz crystal (X1) to be able to go to low power mode (PM0). While idle, the board drains only about 755 microamperes, but each several seconds the Bluetooth chip has fast burst that drain several milliamperes. The battery has a capacity of 180 mA/h, and lasts for two days and a half, so average power consumption must be about 3 mA.

If you want to have a look, you can download the schematics, gerber files and the source files for the BTKeyring firmware, the J2ME Java application and the GNU+Linux script here.

The BTKeychain works great, but... did it solve the problem it was created for? Unfortunately not, because my wife always forgets to charge the keychain O_o. How can I solve this new problem? Maybe using a Bluetooth 4.0 Low Energy device and some kind of energy harvesting? I think getting a new wife will be easier...

My Guruplug + USBLCD

A lot of years ago, I set up a hacked XBox Crystal as a download server, file server and repository. I installed a Gentoo GNU+Linux distro, and I decided not to install X-Windows, because of the low RAM the XBox has (64 MB). The XBox worked great, but due to its low memory, was a bit slow (a lot of HDD thrashing happened) when performing some tasks, like downloading files using aMule daemon, for example. So two years ago, I decided to retire my old XBox to replace it with a Guruplug Server +.

The Guruplug Server + is a nice and small ARM machine. It has a 1,2 GHz CPU, 512 MB RAM, two Gigabit Ethernet ports, WiFi, Bluetooth, an eSata port, two high speed USB host ports, a microSD card reader, etc. The problem with this machine is that it has a flagrant design flaw: The internal heatsink is unable to keep the CPU and memory cool, and this makes the system highly unstable. In my first tests, the system was continuously rebooting even with medium-low CPU loads. This problem was reported to Globalscale (why didn't they discover it anyway?), and in the second batch of Guruplugs, the heatsink was replaced with a tiny and very very noisy fan. The heat problem was solved, but for most users, the noise created a new problem.

To solve the heat problems, I decided to mod my Guruplug. I removed the heatsink, the internal 5V power source (later I used it for The Fonera Plugstrip) and used the hollow it left to add a big heatsink with a silent fan.

The removed tiny heatsink

The removed power source

The heatsink with the fan occupies the space left by the power source

Another capture of the heatsing with the fan
I applied polysynthetic silver thermal compound on the CPU, the RAM chips and the Gigabit Ethernet PHY, and placed the heatsink over them. Then I wired a panel mounted Jack to the 5V input and to the fan power cables. I had to do two holes on the case: a small one for the panel mounted 5V DC Jack, and a big one for the fan. This is the finished mod.

As you can see, the fan has a big air flow input. Ideally, I should have made some more holes to the case, for the air flow output, but it looks like it's not needed, the system works perfect as is, and is very stable (no hangs/reboots in almost two years of work!). To power the entire system, I use a 5V/25W power brick. I could have used a smaller one (maybe 10W are enough), because the entire system drains less than 5W, but as I also have to add a hard disk (about 2,5W more) and maybe some more USB bus powered devices... better safe than sorry.

On the software side, I have built a custom Ångström GNU+Linux distribution. To build the system I have used OpenEmbedded, a set of tools, scripts and configuration files, aimed to build GNU+Linux distributions for embedded systems. OpenEmbedded uses a tool called BitBake for building. BitBake is similar to the Portage tool used in Gentoo distribution, but it is aimed to cross compile for embedded systems.

The Ångström OS image I have built is console based (no X-Windows) and has tools for file serving (samba, ftp, sftp), file sharing (aMule daemon, rtorrent), file downloading (plowshare), and media serving (mediatomb). I have also created some scripts that report specific events to a Twitter account (using OAuth authentication), automagically mount external USB disk drives read only (for unpluging without having to manually unmount them), and share its multimedia contents via mediatomb.

The system works perfect, but I was still missing something: a way to promptly know the system status at a glance, without having to use a computer/smartphone/tablet with a SSH or web client. For that task, I dedided to create USBLCD.

LCD + LEDs + Pushbuttons + USB
USBLCD is just what its somewhat unimaginative name says: A USB board with a LCD. Going into details, it has a 2x12 characters LCD, 6 LEDs, 5 pushbuttons and of course the LCD interface. The heart of the board is a PIC18F4550. There is a small expansion connector to the right of the board, in case I dedide to plug something in (like for example a temperature and humidity sensor). I have defined a simple protocol that allows the host to display whatever it wants in the display and to turn ON and OFF the LEDs. The protocol also defines a way for the USBLCD board to notify the host when a pushbutton is pressed and released.

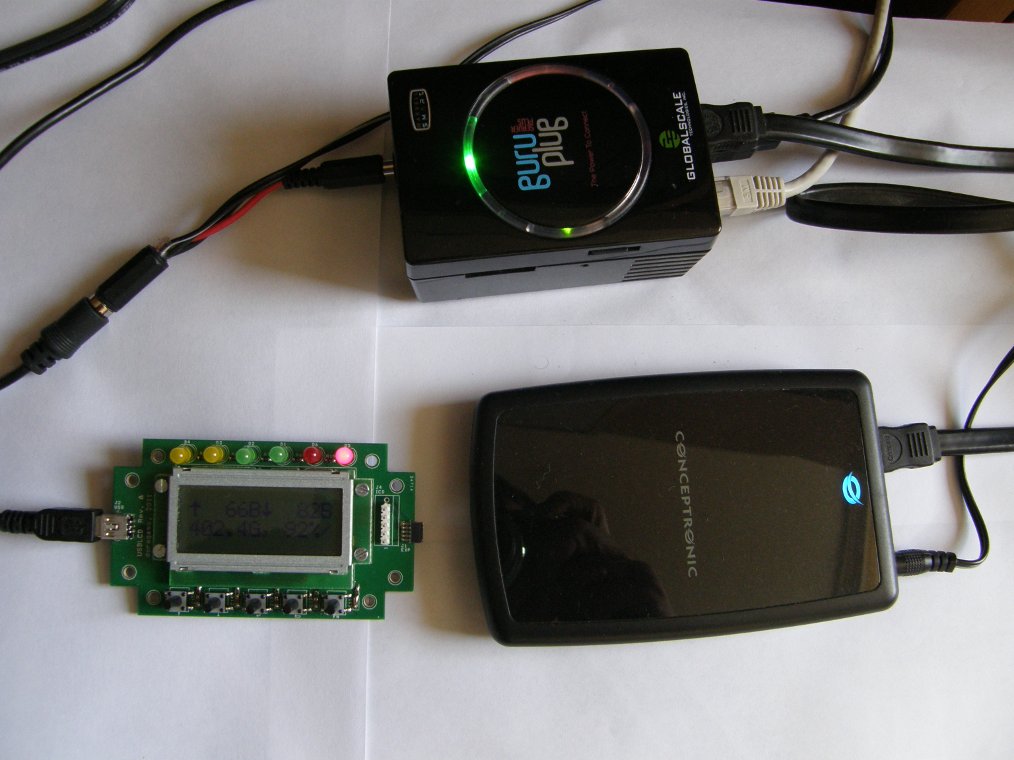
Guruplug + USBLCD + eSata HDD
A small program running in the host, can display three different screens and switch among them when the user pushes the buttons. The first screen shows the upload and download bit rates, and the disk usage in bytes and %. To the bottom right there is a "spinner" made by cycling the "|/-\" characters. The second screen shows the last file downloaded by plowshare, aMule daemon or rtorrent. The third screen shows mediatomb status and allows to launch and kill it. Just by having a quick look to USBLCD, it's possible to know the system status without the need to launch a SSH client and log in the system. Mission accomplished. If you are interested in making your own USBLCD, or are simply curious, you can get the schematics, gerber files and sources for both the microcontroller and the host here.

BONUS: for the LCD, I have used one without backlight, but the board is also prepared for displays with LED backlight. There is a small mosfet transistor driven by a PWM inside the microcontroller, that can drive LEDs up to 300 mA. I have connected another USBLCD board to a white LED strip and have coded a PWM driver. The firmware allows you to change LED intensity from 0 to 100% in steps of 1%, and it also has a timer that automatically shuts down the light when the count hits 0. Both the remaining time and the LED intensity are shown in the screen. Source files for this function, here.